Concrete is an incredibly durable and versatile building material, forming the backbone of countless structures, from our homes and driveways to towering skyscrapers. However, despite its robust nature, concrete is not immune to cracking. This common issue can compromise the structural integrity, aesthetic appeal, and longevity of concrete surfaces, leading to costly repairs and diminished property value.
In fact, a significant percentage of concrete driveways and slabs can show signs of cracking within just a year of installation, highlighting the pervasive nature of this problem.
Understanding why concrete cracks and, more importantly, how to prevent it, is crucial for homeowners, DIY enthusiasts, contractors, and construction professionals alike. This comprehensive guide will demystify the science behind concrete cracking and provide practical, actionable advice covering every stage of the concrete process—from pre-pour planning and proper mixing to precise pouring techniques, meticulous finishing, and essential post-cure maintenance.
By focusing on best practices and technical insights, we aim to equip you with the knowledge to achieve durable, crack-resistant concrete that stands the test of time.
Why Concrete Cracks: Understanding the Basics
To effectively prevent concrete from cracking, it’s essential to first understand the fundamental reasons behind this phenomenon. Concrete, while strong, possesses inherent properties that make it susceptible to cracking under certain conditions. These include its natural tendency to shrink as it dries and hardens (drying shrinkage), the heat generated during hydration (the chemical reaction with water), and its relatively brittle nature, which makes it less tolerant to tensile stresses.
One common misconception is that “all concrete eventually cracks.” While it’s true that concrete is prone to cracking, especially if proper precautions aren’t taken, many cracks are preventable or can be controlled to be non-detrimental. The goal isn’t necessarily to achieve a completely crack-free surface, but rather to manage and minimize cracking to ensure the long-term performance and appearance of the concrete.
Understanding the different types of cracks is also crucial for effective prevention and diagnosis:
Shrinkage Cracks: These are the most common type and occur when the concrete dries and shrinks. They can be plastic shrinkage cracks (forming within the first few hours after placement due to rapid surface drying) or drying shrinkage cracks (developing over weeks or months as moisture evaporates from the hardened concrete).
Settlement Cracks: These cracks appear when the subgrade beneath the concrete settles unevenly, causing the slab to lose support and crack under its own weight or applied loads.
Thermal Cracks: Concrete expands when heated and contracts when cooled. Significant temperature fluctuations can induce stresses that lead to thermal cracking, especially in large, unrestrained slabs.
Overloading Cracks: As the name suggests, these cracks result from applying loads that exceed the concrete’s structural capacity. This can happen if the slab thickness is insufficient for the intended use or if heavy equipment is driven over it before it has reached adequate strength.
Plastic Cracks (Surface Drying): These are shallow cracks that form on the surface of fresh concrete, typically within the first few hours after placement. They occur when the surface dries out too quickly due to factors like high temperatures, low humidity, or strong winds, before the concrete has gained sufficient strength to resist the tensile stresses caused by rapid evaporation.
Planning and Design: The First Line of Defense
Effective crack prevention begins long before the first batch of concrete is mixed. Meticulous planning and thoughtful design are paramount, as decisions made at this stage directly impact the long-term performance and crack resistance of the concrete structure.
Proper Structural Planning
The structural integrity of a concrete slab is heavily dependent on its design. Overlooking these fundamental aspects can lead to premature cracking and structural failure:
Importance of Correct Slab Thickness and Load Calculation: The thickness of a concrete slab must be appropriate for the anticipated loads it will bear. A driveway supporting passenger vehicles will require a different thickness than a heavy-duty industrial floor. Engineers use load calculations to determine the optimal slab thickness, ensuring it can withstand the expected stresses without cracking. Skimping on thickness to save costs is a common mistake that almost guarantees future cracking.
Reinforcement: Rebar vs. Wire Mesh vs. Fiber Mesh: Reinforcement materials do not prevent concrete from cracking, but they do hold the concrete together after it cracks, keeping the cracks tight and less noticeable. This is crucial for maintaining structural integrity and load transfer across cracks.
Rebar (Reinforcing Bar): Typically used in thicker slabs or those subjected to significant structural loads. Rebar provides excellent tensile strength and helps control wider cracks. It should be properly supported and placed in the middle to upper third of the slab for maximum effectiveness.
Wire Mesh (Welded Wire Fabric): More commonly used in thinner slabs like sidewalks or patios. Wire mesh helps distribute shrinkage stresses and keeps small cracks from widening. It must be lifted into the concrete during the pour or supported on chairs to ensure it is embedded correctly within the slab, not lying on the subgrade.
Fiber Mesh (Synthetic Fibers): Dispersed throughout the concrete mix, fiber mesh helps reduce plastic shrinkage cracking by providing microscopic reinforcement. While effective for controlling early-age cracking, it does not replace the need for rebar or wire mesh for structural reinforcement.
Joint Placement Strategy
Joints are intentionally created weakened planes in the concrete that allow it to crack in a controlled, predetermined manner. This is a critical strategy for managing the inevitable shrinkage and thermal expansion/contraction of concrete.
Why Control Joints are Critical: Also known as contraction joints, these joints create lines of weakness where the concrete can crack as it shrinks. Without them, random, unsightly cracks will appear. Control joints should be saw-cut or grooved into the fresh concrete.
Spacing and Depth of Contraction Joints: The spacing of control joints is crucial and depends on the slab thickness, concrete mix, and expected shrinkage. A common rule of thumb is to space joints in feet at 2-3 times the slab thickness in inches (e.g., for a 4-inch slab, joints should be 8-12 feet apart). The depth of the cut should be at least one-quarter of the slab thickness.
Isolation Joints Near Walls, Pillars, etc.: Also known as expansion joints, these joints completely separate the concrete slab from other structures like walls, columns, or foundations. They allow independent movement between the slab and the adjacent structure, preventing cracking due to differential settlement or thermal expansion.
Site Assessment
The conditions of the site where concrete is poured significantly influence its susceptibility to cracking. A thorough site assessment and preparation are non-negotiable.
Soil Conditions and Compaction: The subgrade (the soil beneath the concrete) must be stable and uniformly compacted. Uneven compaction or unstable soil can lead to differential settlement, causing the concrete to crack. A well-drained, uniformly compacted granular base (like gravel) is often recommended over the subgrade to provide a stable, consistent bearing surface.
Water Drainage & Slope Grading (Avoiding Water Accumulation): Proper site grading is essential to ensure water drains away from the concrete slab. Standing water beneath or around the concrete can saturate the subgrade, leading to instability, erosion, or freeze-thaw damage, all of which can contribute to cracking. A minimum slope of 1/8 to 1/4 inch per foot away from structures is generally recommended.
Mixing the Right Concrete
The quality of the concrete mix itself is a fundamental factor in preventing cracks. A properly designed and mixed concrete batch will have the necessary strength, workability, and durability to resist cracking.
Concrete Mix Design Matters
Water-Cement Ratio: Ideal Balance to Avoid Shrinkage: This is arguably the most critical factor in concrete mix design. The water-cement ratio (w/c) is the ratio of the weight of water to the weight of cement in a mix. A lower w/c ratio generally leads to stronger, more durable concrete with less shrinkage, thus reducing the potential for drying shrinkage cracks. However, too low a w/c ratio can make the concrete difficult to work with. The ideal balance ensures adequate workability without compromising strength or increasing shrinkage. For most residential and light commercial applications, a w/c ratio between 0.40 and 0.50 is often recommended.
Use of Admixtures for Durability (e.g., Plasticizers, Air-Entraining Agents): Admixtures are ingredients added to concrete immediately before or during mixing to modify its properties. They can significantly enhance concrete’s performance and crack resistance:
Plasticizers (Water Reducers): These admixtures allow for a reduction in the amount of mixing water while maintaining the desired slump (workability). This helps achieve a lower w/c ratio, leading to higher strength and reduced permeability and shrinkage.
Air-Entraining Agents: These create microscopic air bubbles within the concrete, which significantly improves its resistance to freeze-thaw cycles. In cold climates, water freezing within concrete can cause internal stresses and cracking. Entrained air provides tiny chambers for expanding ice, mitigating this damage.
Choosing the Right PSI (Strength) for Your Application: PSI (pounds per square inch) indicates the compressive strength of concrete. Different applications require different strengths. For instance, a patio might only need 2500 PSI concrete, while a heavy-duty driveway or foundation might require 4000 PSI or more. Using concrete with insufficient strength for its intended purpose will make it more susceptible to cracking under load.
Best Practices During Pouring
Even with a perfect mix and a well-designed plan, the success of a concrete project hinges on the execution during the pour. Proper pouring techniques are essential to ensure the concrete is placed and consolidated correctly, minimizing the risk of cracking.
Site Preparation
Compacting Subgrade & Base: Before pouring, the subgrade and any base material must be thoroughly and uniformly compacted. This creates a stable foundation that will not settle unevenly under the weight of the concrete. A plate compactor is often used for this purpose. Any soft spots should be excavated and filled with compacted granular material.
Using a Vapor Barrier or Gravel Layer: A vapor barrier (typically a plastic sheet) is often placed over the subgrade, especially for interior slabs. This prevents moisture from the ground from migrating up through the concrete, which can cause issues like efflorescence (a white, powdery deposit on the surface) and delamination of floor coverings. A layer of gravel can also be used to provide a capillary break, preventing moisture from wicking up from the subgrade.
Proper Pouring Techniques
Avoiding Delays During Pour (to Prevent Cold Joints): Concrete should be placed as continuously as possible. Delays in the pour can allow the previously placed concrete to begin setting before the next batch is added. This can create a “cold joint,” a weak point where the two batches of concrete do not bond properly, which can lead to cracking.
Maintaining Consistent Thickness Throughout: The concrete should be spread evenly to maintain a consistent thickness across the entire slab. Using a screed (a long, straight board) to level the concrete is crucial for achieving a uniform surface.
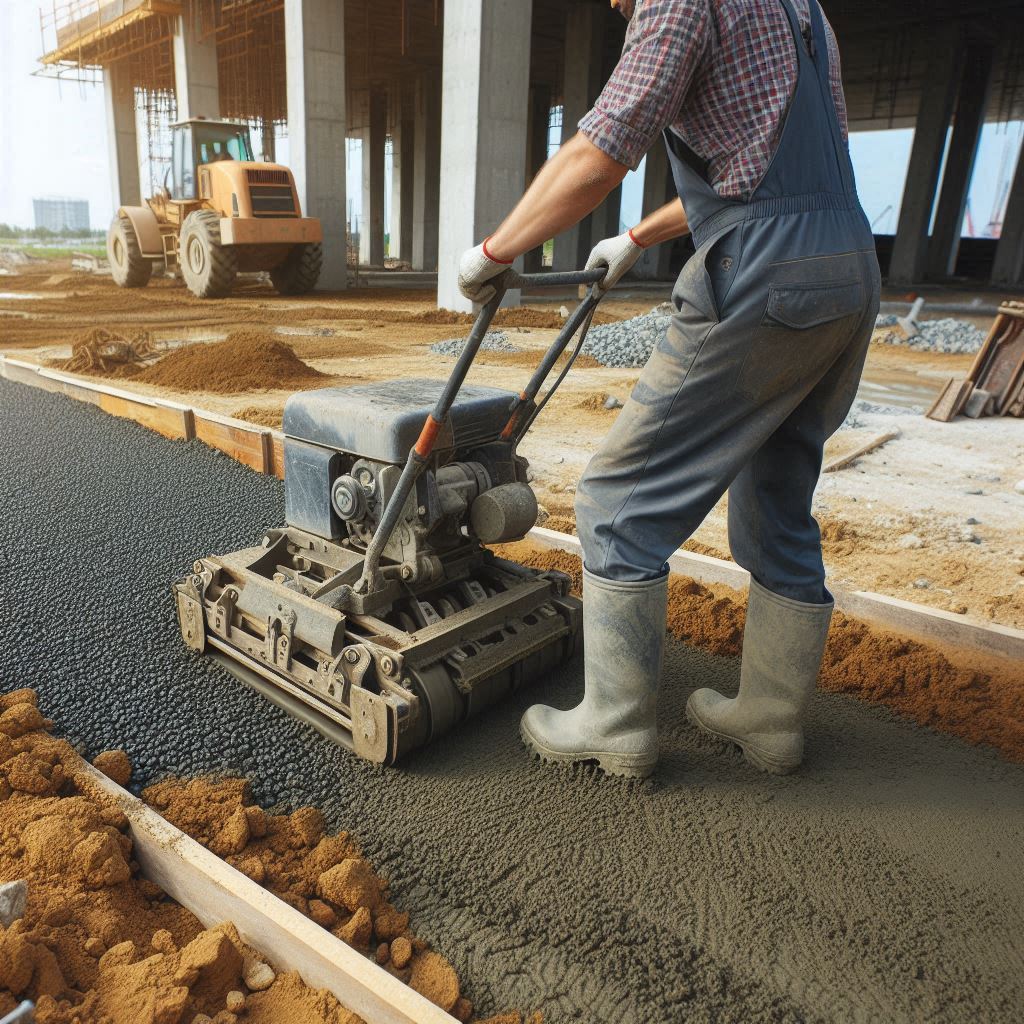
Using Screed and Bull Floats Correctly: After the concrete is placed and spread, it should be screeded to the proper elevation. A bull float is then used to smooth the surface and embed the coarse aggregate just below the surface. This initial finishing should be done carefully to avoid overworking the surface, which can bring excess water and fine particles to the top, creating a weak surface layer.
Finishing Techniques to Minimize Cracking
The finishing stage of concrete placement is crucial for both the aesthetic appeal and the durability of the slab. Improper finishing can significantly increase the likelihood of surface cracking.
Don’t Overwork the Surface
Why Over-troweling Brings Water to the Surface (Weakening It): One of the most common mistakes in concrete finishing is over-troweling or overworking the surface. When the concrete is still plastic, excessive troweling brings a layer of water and fine cement particles (fines) to the surface, creating a weak, porous layer known as laitance. This laitance is prone to dusting, scaling, and most importantly, random surface cracking as it dries and shrinks at a different rate than the bulk concrete below. Finishers should wait until the bleed water has evaporated and the concrete has stiffened sufficiently before beginning final finishing operations.
Weather Considerations
Environmental conditions during and immediately after pouring have a profound impact on the concrete’s curing process and its susceptibility to cracking. Rapid evaporation of surface moisture is a primary cause of plastic shrinkage cracking.
How Temperature, Humidity, and Wind Affect Curing:
Temperature: High ambient temperatures accelerate the hydration process and can lead to rapid drying. Conversely, very low temperatures slow down hydration, increasing the time the concrete remains plastic and vulnerable to surface drying.
Humidity: Low humidity levels increase the rate of evaporation from the concrete surface.
Wind: Wind, even a gentle breeze, can dramatically increase the rate of surface evaporation, drawing moisture out of the concrete much faster than it can be replaced by bleed water.
Using Windbreaks, Sunshades, or Fogging to Control Evaporation: When conditions are conducive to rapid evaporation (high temperature, low humidity, high wind), measures must be taken to mitigate moisture loss:
Windbreaks: Erecting temporary barriers to block wind can significantly reduce evaporation.
Sunshades: Protecting the concrete from direct sunlight helps keep the surface temperature lower and reduces evaporation.
Fogging: Using a fine mist of water (fogging) above the concrete surface increases the humidity of the air directly above the slab, reducing the vapor pressure differential and slowing down evaporation. This should be done carefully to avoid adding water to the concrete surface itself.
Curing: The Most Overlooked Step
Curing is arguably the most critical, yet often overlooked, step in preventing concrete cracks and achieving its full strength and durability. Proper curing ensures that the concrete hydrates properly, leading to a stronger, more resilient slab.
Importance of Proper Curing
Curing is the process of maintaining adequate moisture and temperature in concrete for a period of time immediately following placement, so that hydration of the cement can continue and the concrete can achieve its potential strength and durability. Without proper curing, the concrete surface can dry out too quickly, leading to a weak surface that is highly susceptible to cracking, dusting, and scaling.
When Curing Should Begin (ASAP after Finishing): Curing should begin as soon as the surface is firm enough to resist damage, typically immediately after the final finishing operations are complete. Delaying curing, even for a few hours, can significantly increase the risk of plastic shrinkage cracks and reduce the concrete’s ultimate strength.
How Long to Cure Concrete (7 Days Minimum, Ideally 28): The curing period depends on the type of cement, mix design, and ambient conditions. As a general rule, concrete should be cured for a minimum of 7 days. However, for optimal strength and durability, a curing period of 28 days is ideal, as concrete continues to gain strength over this longer period.
Methods of Curing:
Wet Curing (Keeping it Moist): This is one of the most effective curing methods. It involves continuously keeping the concrete surface moist by:
Ponding: Flooding the surface with water (suitable for flat slabs).
Spraying/Fogging: Continuously misting the surface with water.
Wet Coverings: Covering the concrete with wet burlap, cotton mats, or other absorbent fabrics that are kept continuously saturated with water.
Curing Compounds: These are liquid membranes applied to the concrete surface to form a thin, impermeable film that prevents the evaporation of moisture. They are convenient for large areas but must be applied uniformly and at the correct coverage rate to be effective.
Covering with Plastic Sheets or Burlap: Impermeable plastic sheets (polyethylene film) can be used to cover the concrete, trapping the moisture within. The edges of the plastic should be weighted down to prevent wind from lifting them. Burlap, when kept continuously wet, also provides an excellent curing environment.
Post-Pour Maintenance & Care
Once concrete has been properly placed, finished, and cured, ongoing maintenance and care are essential to ensure its long-term performance and to further minimize the risk of future cracking.
Avoid Heavy Loads During Early Curing Stages: Even after the initial curing period, concrete continues to gain strength for several weeks, typically reaching its design strength at around 28 days. It is crucial to avoid placing heavy loads or driving vehicles on new concrete during these early stages. Premature loading can induce stresses that lead to cracking, especially if the concrete has not yet achieved sufficient compressive strength.
Sealing the Concrete (Types of Sealers & When to Apply): Sealing concrete is a vital step in protecting it from moisture penetration, freeze-thaw damage, and chemical attack, all of which can contribute to cracking. Sealers create a protective barrier on the surface.
Types of Sealers:
Penetrating Sealers: These sealers penetrate into the concrete pores, reacting chemically to form a barrier that repels water and chlorides. They do not change the appearance of the concrete and are excellent for protecting against freeze-thaw damage and efflorescence. Examples include silanes and siloxanes.
Topical Sealers (Acrylic, Epoxy, Urethane): These form a protective film on the surface of the concrete. They can enhance the color, provide a glossy finish, and offer good stain resistance. However, they may require more frequent reapplication and can be slippery when wet. Acrylics are common for decorative concrete, while epoxies and urethanes offer higher durability for industrial applications.
When to Apply: Most sealers should be applied after the concrete has fully cured, typically 28 days after placement, to ensure proper adhesion and performance. Always follow the manufacturer’s recommendations for application and reapplication intervals.
Annual Maintenance Tips: Regular, simple maintenance can significantly extend the life of your concrete and prevent issues that lead to cracking:
Regular Cleaning: Keep the concrete surface clean from dirt, debris, and organic matter. Use a broom, hose, or pressure washer (with caution to avoid damaging the surface) to remove grime.
Address Stains Promptly: Clean up oil, grease, and other spills as soon as possible to prevent them from penetrating the concrete and causing deterioration.
Inspect Joints: Periodically check control and isolation joints. If the joint filler or sealant has deteriorated, replace it to prevent water and debris from entering the joint and undermining the subgrade.
Monitor Drainage: Ensure that water continues to drain away from the concrete slab. Clear gutters and downspouts, and maintain proper grading around the concrete.
How to Prevent Cracks in Specific Projects
While the general principles of concrete crack prevention apply universally, certain types of projects have unique considerations that warrant specific attention.
Concrete Driveways
Driveways are particularly susceptible to cracking due to constant exposure to dynamic loads (vehicles), environmental stresses (freeze-thaw cycles, sun exposure), and often, less-than-ideal subgrade conditions.
Joint Spacing: For driveways, proper joint spacing is even more critical. Given the typical 4-inch thickness of residential driveways, control joints should generally be spaced no more than 10 feet apart in both directions, creating square or nearly square panels. Avoid long, narrow panels, as these are more prone to cracking. Saw cuts should be made as soon as the concrete can support the saw without raveling, typically within 6-18 hours after finishing.
Load-Bearing Reinforcement: While fiber mesh can help with plastic shrinkage, driveways benefit significantly from structural reinforcement. For residential driveways, 6×6-W2.9/W2.9 welded wire mesh or #3 (3/8-inch) rebar spaced at 18-24 inches on center is commonly recommended. This reinforcement should be properly supported to ensure it is in the middle to upper third of the slab, not resting on the subgrade.
Basement or Garage Floors
These interior slabs are less exposed to extreme weather but face challenges related to moisture and potential settlement.
Vapor Barriers & Subfloor Prep: A high-quality vapor barrier (10-mil or thicker polyethylene sheeting) is essential beneath basement and garage slabs to prevent moisture vapor transmission from the ground. This protects floor coverings, prevents mold growth, and helps maintain a stable moisture content within the concrete, reducing drying shrinkage. The subgrade must be well-drained, uniformly compacted, and free of organic matter.
Concrete Patios & Walkways
Patios and walkways are often thinner and more exposed to surface elements, making them vulnerable to specific types of cracking.
Preventing Root Intrusion: If located near trees or large shrubs, root intrusion can be a significant cause of cracking in patios and walkways. Tree roots can grow under and lift concrete slabs, leading to settlement cracks. Consider root barriers or maintain adequate distance from mature trees when planning these installations.
Dealing with Freeze-Thaw Cycles: In regions with freezing temperatures, patios and walkways are highly susceptible to damage from freeze-thaw cycles. Water absorbed into the concrete expands when it freezes, creating internal pressure that can lead to scaling, spalling, and cracking. Using air-entrained concrete (typically 5-8% air content) is crucial for these applications, as the microscopic air bubbles provide relief valves for expanding ice. Proper drainage and sealing also play a significant role.
Bonus: How to Fix Minor Cracks if They Appear
Despite all preventive measures, minor cracks can sometimes appear in concrete. Understanding which cracks are cosmetic and which are structural, and how to address them, is important for maintaining your concrete.
Crack Width Guide (Which Ones Are Structural vs. Cosmetic)
Hairline Cracks (less than 1/16 inch wide): These are typically cosmetic and often result from normal drying shrinkage. They generally do not affect the structural integrity of the concrete and can often be left alone or easily repaired.
Minor Cracks (1/16 inch to 1/4 inch wide): These may indicate slightly more significant movement or stress. While still often cosmetic, they might allow water penetration, which can lead to freeze-thaw damage or rebar corrosion. These should generally be repaired.
Major Cracks (greater than 1/4 inch wide), Cracks with Vertical Displacement, or Cracks that Widen Over Time: These are often indicative of structural issues, significant settlement, or ongoing movement. They require professional assessment and repair, as they can compromise the safety and stability of the structure.
How to Fill Hairline Cracks (DIY): For hairline to minor cracks, DIY repairs can be effective:
Clean the Crack: Use a wire brush or vacuum to remove any loose debris, dirt, or vegetation from within the crack. For deeper cracks, a chisel might be needed to widen the top slightly to allow repair material to penetrate.
Choose the Right Filler: For hairline cracks, a concrete crack filler or sealant (often acrylic or polyurethane-based) is suitable. These come in tubes for easy application. For slightly wider cracks, a patching compound or epoxy injection kit might be necessary.
Apply the Filler: Follow the manufacturer’s instructions. Typically, the filler is squeezed directly into the crack. For deeper cracks, multiple applications might be needed. Use a trowel or putty knife to smooth the surface.
Cure: Allow the filler to cure according to the product’s instructions before exposing it to traffic or moisture.
When to Call a Pro (for Structural or Foundation Cracks): If you encounter any of the following, it’s time to consult a qualified concrete contractor or structural engineer:
Major cracks (over 1/4 inch wide): Especially if they extend through the entire slab or foundation.
Cracks with vertical displacement: Where one side of the crack is higher or lower than the other, indicating significant settlement.
Cracks that continue to widen: Suggesting ongoing movement or an unresolved underlying issue.
Cracks in load-bearing walls or foundations: These can compromise the structural integrity of your home.
Multiple interconnected cracks forming a spiderweb pattern: This can indicate a serious subgrade issue or improper mix.
FAQs
Can all cracks be prevented in concrete?
While it’s nearly impossible to prevent all cracks in concrete due to its inherent properties (like drying shrinkage), most significant and detrimental cracks can be prevented or controlled through proper planning, mix design, placement, finishing, and especially, diligent curing. The goal is to manage where and how cracks occur, directing them into control joints rather than allowing random, unsightly, or structurally compromising cracks to form.
Does sealing concrete stop cracking?
Sealing concrete does not directly prevent cracking caused by drying shrinkage or structural issues. However, sealers play a crucial role in preventing water and harmful chemicals from penetrating the concrete, which can exacerbate existing cracks or lead to new ones through freeze-thaw cycles, rebar corrosion, or chemical attack. By protecting the concrete from environmental damage, sealers contribute to its overall durability and longevity, indirectly reducing the likelihood of certain types of cracks.
Should I worry about small hairline cracks?
Generally, small hairline cracks (less than 1/16 inch wide) are cosmetic and are a normal occurrence due to concrete’s natural drying shrinkage. They typically do not affect the structural integrity of the slab. However, it’s a good practice to monitor them. If they widen significantly, show vertical displacement, or allow water penetration, then they may require attention. For peace of mind and added protection, even hairline cracks can be sealed to prevent water ingress.
What’s the best temperature to pour concrete?
The ideal temperature range for pouring concrete is typically between 50°F and 70°F (10°C and 21°C). Pouring in this range allows for optimal hydration and curing, minimizing the risk of rapid drying (which can lead to plastic shrinkage cracks) or excessively slow setting. When temperatures are outside this range, special precautions are necessary, such as using admixtures to accelerate or retard setting, or employing protective measures like sunshades, windbreaks, or insulation blankets.
Conclusion
Preventing concrete from cracking is not an exact science, but rather a meticulous process that demands attention to detail at every stage. While the adage “all concrete eventually cracks” holds a grain of truth, the vast majority of problematic and unsightly cracks can be avoided or significantly minimized by adhering to best practices in planning, mixing, pouring, finishing, and especially, curing.
By understanding the fundamental properties of concrete, implementing proper structural planning and joint placement, utilizing the correct mix design, executing precise pouring and finishing techniques, and committing to thorough curing and ongoing maintenance, you can dramatically increase the longevity and aesthetic appeal of your concrete surfaces. Remember, concrete is a durable material, and with the right approach, it can serve its purpose beautifully for decades.
Ultimately, investing time and effort upfront in preventive measures will save you significant costs and headaches associated with crack repair down the line. For large or complex projects, or if you are ever in doubt, always consult with a qualified concrete contractor. Their expertise can ensure your concrete project is a success, delivering a strong, durable, and crack-resistant surface that stands the test of time.